
 |
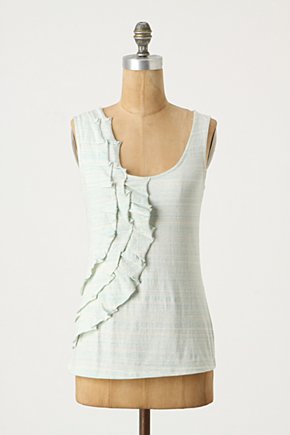
| The Inspiration |
 |
| My version |
Here's a mini-tutorial of what I did:
I purchased a t-shirt from the clearance rack at Target.

I didn't want to buy two, so I found one with long-sleeves, hoping the sleeves would work for what I wanted to do.

I cut off both sleeves, just shy of the seam where the sleeves were attached to the shirt.

Next, I cut each sleeve open, along the serged seam of the sleeve.

This would be the fabric from which I would make the 'waves' on the side of the shirt .

I cut both sleeves in half, lengthwise, along the existing crease; I now had four pieces of fabric to work with (in th end I only used 3 pieces). To make sure that all of the material was without stitched seams, I cut off all serged portions of the sleeves.

I pinned the armholes, and sewed them back so they would have finished edges.

Using one piece of my sleeve material, I folded it at the top, lined it up with the seam at the top of the shirt, and pinned it in place.

I continued to pin along the outer edge of the armhole, folding up and creasing one section at a time until I reached the side of the shirt. This was easiest to do by following the existing curve of the armhole.


I then top-stitched it in place, as close to the armhole seam as possible. Once sewn in place, I trimmed off the excess fabric from the wave to my desired width.

I repeated this process two more times, just placing each sleeve piece where I wanted it to fall on the shirt. Once all three waves were sewn in place, I folded the ends along the side of the shirt and top-stitched right along the side seam of the shirt.


There you have it! Hope you can find an inexpensive t-shirt soon and try your own refashion!
I'll be linking up over Sew Much Ado's We Did it Wednesday! and Tea Rose Home's Link Party No.56. Be sure to head over to these two blogs and check out all the projects people have done this week!
Lauren this is amazing!! I can't wait to see it in person.
ReplyDeleteWhoa! Can you wear it this weekend? So cool!
ReplyDeleteThis is great, Lauren!! I just never know what I'm going to find that you've done....thanks for posting it all on your blog so I can see!
ReplyDeleteGreat job! I am just wondering- did you leave the armholes raw or hem them? I love knit fabric because you always have a choice.
ReplyDeletegreat idea! thanks for the inspriation!
ReplyDeleteDeb, I pinned the edge of the armhole (where I cut it off) back around the serged edge of the armhole seam and stitched right along that seam. Hope that makes sense!
ReplyDeleteVery nice! I love clearance shirts. :) Thanks for sharing your how to, I def want to try this one.
ReplyDeleteWow this is great!!
ReplyDelete